
I've been wanting to make self-striping sock yarn FOR-EV-ER, & I finally did it! The impetus was wanting to do a dye project for the Downhill Dyeing event during Ravelympics, & although I didn't blog about it then, I did do one! (Just a leeeetle behind in my blogging this week.) So, here's a photo 'tutorial' of my day of dyeing - not THE way to do it, just MY way of doing it.

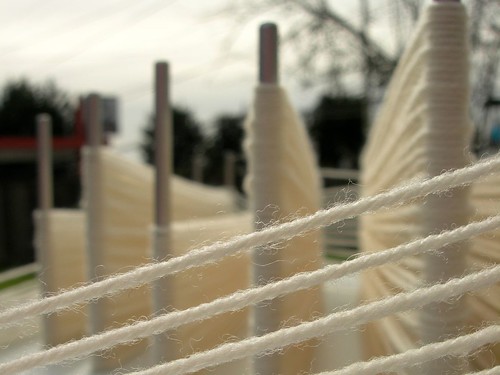
Have you ever seen Scout's warping board? I saw it a couple of year's ago, & immediately coveted one of my own. In addition to being the tool of choice for preparing warp yarn for weaving, it is an invaluable assist in managing the exceptionally long skeins required for dyeing self-striping yarn. My handy Andy, Cole, made me this one last fall.
I used a hank of Color Your Own 4-ply fingering weight yarn from KnitPicks (now KP Merino Wool Bare) that I got from a Raveler, Chronicles, who was de-stashing it. It is not as tightly plied as I like in a sock yarn, but it is nice and soft, & the price was right: only $2! No nylon, just 100% merino wool; we'll see how this yarn wears over time.

I was inspired by yarn I saw on Ravelry, Scout's Swag 'Tarzhay' colorway that Nyxxie knit up into Rainbow Bright Socks; Scout no longer does self-striping yarn, but I figured I could make something like it. I made this strping pattern in Photoshop to set up what I'd hoped it would look like when dyed. There was a bit of a mishap with the green, though, LOL. More on that later.
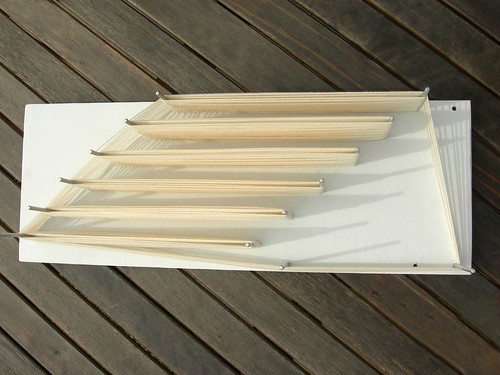
That's what the board looked like after I warped it. I decided on a 3/5/3/5/7/5 wrapping sequence to achieve the pattern above. It took me over an hour to warp the board, leading me to a better understanding of why most dyers don't do self-striping yarns. But I'm a glutton for punishment.
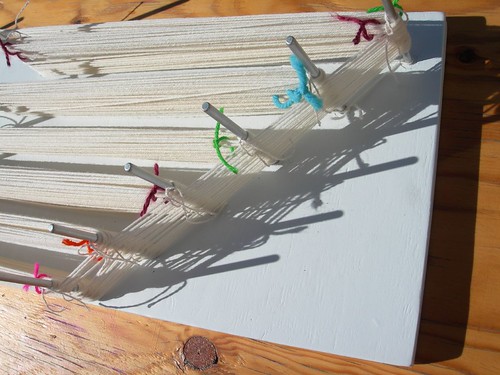
It occurred to me that it might be hard to figure out where the dye goes once I had the yarn off the board, so I had a flash of inspiration before removing it: I tied scraps of yarn in the colors I was planning to use at the start and finish of each section. Brilliant! Worked out great, as it turns out.
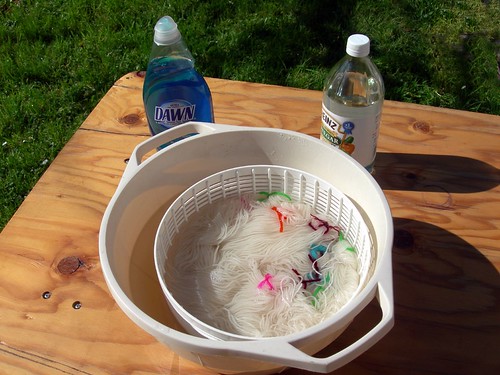
Next step was to soak the yarn. I used the tiniest bit of liquid soap (don't use too much, you don't want suds), plus a few glugs of vinegar (or an acetic or citric acid solution; this time, vinegar was just easier, & I like the scent.) This prepares the yarn to take the dye.
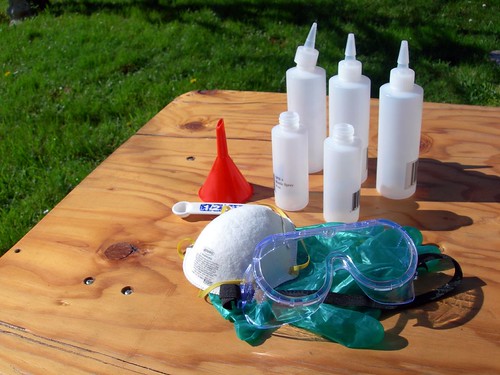
I'm VERY serious about safety precautions: all my dyeing tools are dedicated to that purpose, and I heed the prohibitions against mixing dye powders indoors. In that form, they are highly toxic & easily ingested. I don't care HOW careful people think they are, when you mix dye powder the fine particles alight everywhere. Do you really want that to be your kitchen counters, your cooking tools, your family??? Do what you want, but me, I'm staying outdoors, or in my garage with the door open.
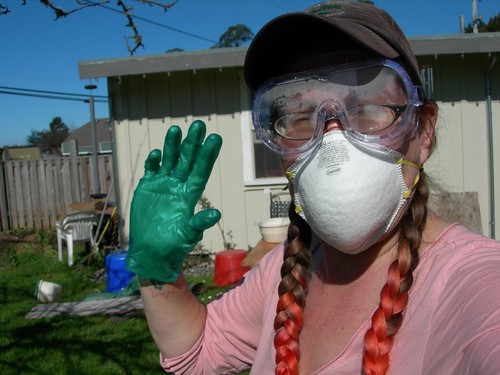
So, I collect up my equipment, & don my safety gear. Aren't I just stupid cute in my foggy safety goggles? ;) Right now, I'm using a particle mask, but I've decided that isn't a good enough prophylactic, & I'm planning to purchase a cartridge respirator like this one. $35 to keep my lungs happy? Totally worth it.

Before I get down to the dyeing itself, let me just show you what I'm talking about with dye particles floating around. I forgot to move my soaking yarn to another table while mixing up the dye solutions; if you look closely, you can see small orange & turquoise spots of color in my otherwise pristine yarn in this picture. OK, end of safety rant. On to actually dyeing!
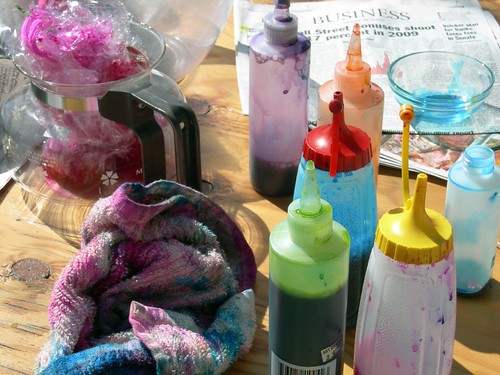
My dyes! Mmmm, purdy, aren't they?
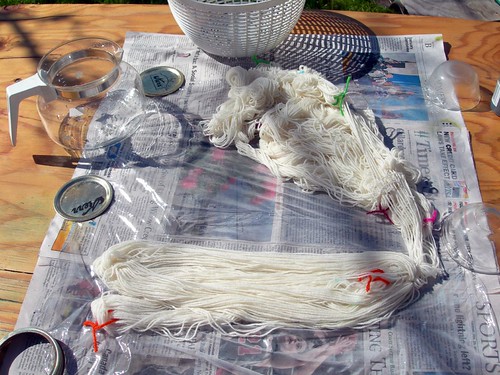
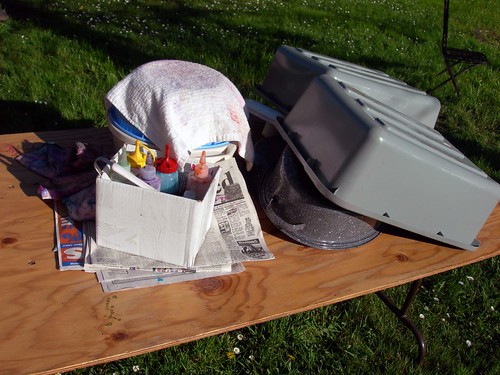
So, my blank 'canvas'. First, I lay a layer of newspaper down on top of my table, then spray it with water to give any loose dye particles something to stick to. (I actually did this before mixing my dye stock). Next comes a layer of plastic wrap that I set the damp yarn on; oh, yeah, I drained the yarn first, to remove most of the water. All that other crap in the picture? Just there to hold the newspaper & plastic wrap down; it was a windy day.
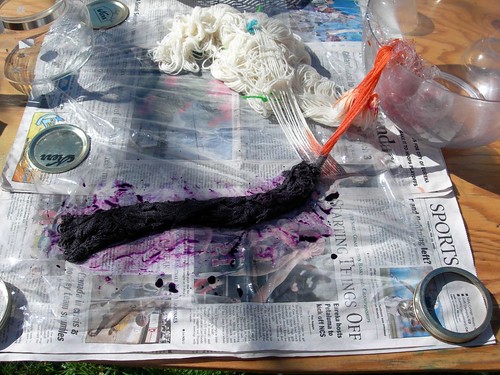
Now, I'm ready to apply my dye! I usually use squirt bottles, although other methods come in handy sometimes too. Play around, see what works for you. You can see that I've done the first orange section (it is wrapped & sitting in the bowl, above right) and I've just finished a purple section. I carefully double-wrapped each section in plastic wrap to keep the sections from cross-contaminating one another. That worked only so-so, btw.

By the time I reached the lime section, which was last, though not by design, I had a LOT of dye splotches on that section. I was afraid if I went ahead with my plan of dyeing that segment lime green, it would be all splotchy and ugly. So I decided to shoot for intentionally splotchy, like flecks. But as you can see (look at the section wrapped but not in the bowl), it didn't work out that way - just the same ugly splotchy I would have gotten anyway, haha! It's dangerously close to the dreaded 'B' word: brown.
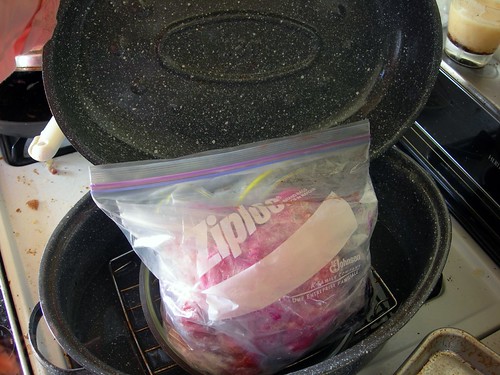
We're ready to cook the yarn now! This time, I used an old enameled roasting pan from a thrift store, plus the rack from inside a toaster oven, also thrifted. I've placed all plastic wrapped sections into sandwich baggies, & each of those bags into a big ol' ziploc that I've cracked open to allow steam to escape. That goes on top of the rack, and I add enough water to just reach the rack.
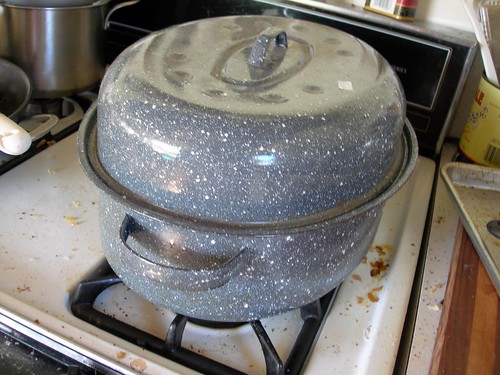
Set the heat to low & steam for approximately 45 minutes, checking occasionally to be sure you don't boil your water away (ask me how I know this). And please don't notice how dirty my stove is! (Commence humming the theme to Jeopardy in your mind for the duration of this segment of the program.)
Now, we're out of the kitchen & back into the great outdoors, while the yarn cools. This can be done overnight by just leaving the yarn in the wrapping like this...
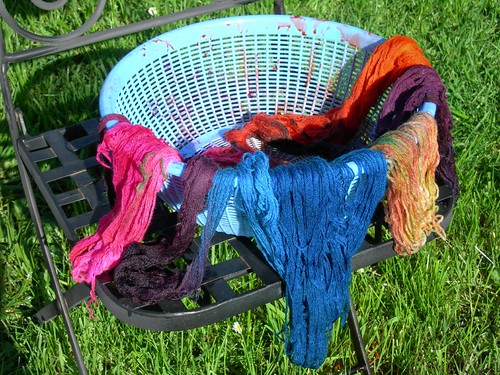
...or sped up by carefully removing the yarn and placing it in a collander (for air circulation) to dry, like this. Please, no steam burns!
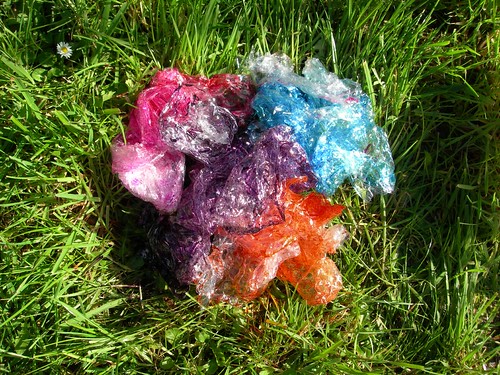
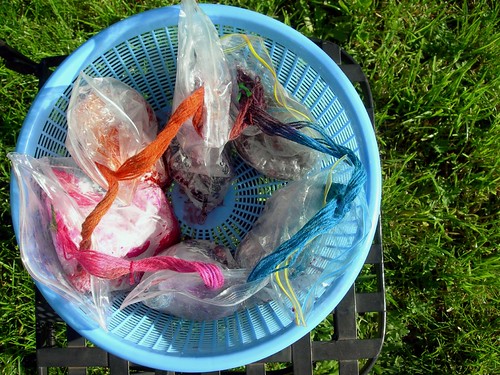
And this is what you have left over: messy, hard-to-reuse plastic wrap. Some dyers re-use their plastic wrap, but this just sounds awful to me; so for dye day #2, I switched to an all baggie system; they are much easier to rinse out & re-use, in my opinion. Waste = bad.
Once your yarn is COMPLETELY cooled, you want to rinse it in cool water until the water runs clear. (Don't agitate it, overly handle it, or shock it with hot water or you will have FELT.) If you have mixed your dye stocks properly, you will have used just the right amount of dye powder, & the dye will be completely exhausted, so no dye will rinse out. This almost never happens for me, as I am a lazy measurer.
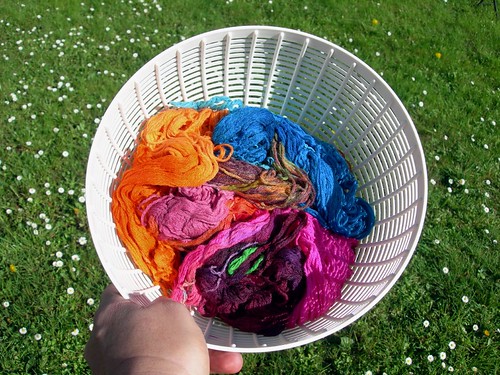
But look what we have when all this is done: pretty yarn!! Here, it is put back onto the warping board to dry, no easy feat with the warping pattern I used. I switched to a simpler wrapping scenario for my next attempt, & it went much better. Drying went faster once I hung the skein to dry.
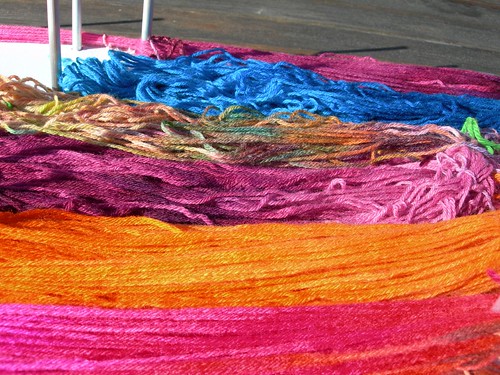
I was also initially dismayed that the colors didn't dye evenly, but now I've decided that I actually like the ombre effect better than my original idea. As for the section that was supposed to be green but isn't, I'm thinking it might work out OK, kind of a muted, fair-isle-y section, but if it is too unattractive when it knits up, I'll just cut those sections out; luckily it is the narrowest band.
The last thing to do before I show you the finished yarn is clean up. I'm not the neatest person on the planet (!), but even I know that rinsing equipment & letting it air dry, then putting it away between uses will prolong the life of your stuff. So, I do. Now, without further ado, I give you 'Tarzhay Wannabe'!!
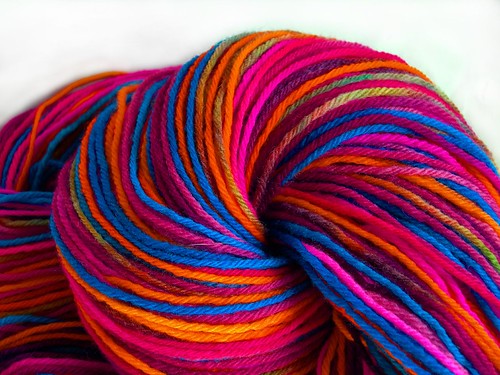
I thought I wouldn't like the not-as-I-envisioned it yarn, but it is really growing on me fast. It's kinda autumnal, in a retina-burn kinda way, don'tcha think?
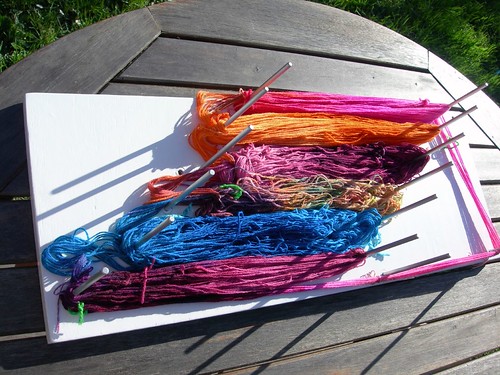
Now, I totally get why dyers don't, in the main, do self-striping yarn! I spent 1 hour+ warping the board, all day dyeing the yarn, & the better part of Saturday night untangling the damn stuff! (Don't let that photo of the dyed yarn drying on the warping board: it isn't even CLOSE to being on the pegs properly, & is in all reality a camouflaged giant tangle.) But that photo above shows that, for me, it was totally worth it. In fact, I dyed another skein a few days later! You'll have to check back for photos of that one. Just my little way of trying to get you to come back.
I have big plans for this yarn, & not surprisingly, it's a sock pattern! I've started a project page in my Ravelry notebook for it, in fact. I'm going to try magic loop for the first time! I have the needles I got when I was in the YarnPirate sock club that should work for it, & I found a pattern from KnitPicks designed specifically for this yarn; AND it's knit toe-up, my fave!
So, now you know how I made myself some self-striping yarn. You should give it a try!
Tags:
Velma, it's gorgeous! The colors are so intense! It's going to be wonderful as a pair of socks. I can't wait to see the finished project...
ReplyDeleteTotally Velma color!--even without an acidic green :)
ReplyDeleteThis was such an informative post. Thank you. I SO appreciate those of you who dye (and spin).
Kathleen
WOW! Wowee! So beautiful! And you've cured me from wanting to try dying on my own anytime very soon! :)
ReplyDeletebeauiful yarn!!!! can't wait to see your finished socks!!!
ReplyDeletesorry about the no caps thing - twnb (typing while nursing baby)!
i'm sure that i don't have nearly the patience you have for dyeing self-striping yarn.
ReplyDeletebut you have convinced me that i need to find a way to get my dye-mixing out of the kitchen and always wear my protective gear. oof! not sure how i'll swing that yet, but it must be done.
thanks for a great post!
It is SO COOL and informative to see this process. And the result is way gorgeous.
ReplyDeleteGreat post!!! I have a lot of undyed yarn ready for me to dye when the weather gets better. Like you, I know I need to do it outside and use safety measures.
ReplyDeletePart of my job is professional safety consultant and I'd like to recommend a full-face respirator (if you don't wear glasses). It'll take care of the goggle issue. Also, get a organic vapor/hepa filter combo cartridge. Personally, the hepa filter may be enough, but your choice of the organic vapor isn't without reason, so I'd consider it.
You've inspired me to get ready to dye my yarn. :D
Wow Velma now that is just awesome and the colors are really gorgeous, even the bit you dont like lol
ReplyDeleteCant wait to see the finished socks :))
Fantastic! i have been dabbling in dying and really want to try to do some self striping dye. this is so inspiring.
ReplyDelete